Jenkins Integration
Installation
The recommended way to install Jenkins on macOS is through homebrew:
brew update && brew install jenkins-lts
From now on start Jenkins by running:
brew services start jenkins-lts
To store the password in the Keychain of your remote machine, it is recommended that you run match or deliver using ssh or remote desktop at least once.
Ruby Environment
We recommend using rbenv for installing Ruby, though rvm and the version of Ruby that comes bundled on macOS are fine too.
If using a Gemfile in your project, add an "Execute shell" step as your first build step and call bundle update.
Plugins
You'll find the following Jenkins plugins to be useful:
(note: We do not recommend installing the Xcode plugin)
- HTML Publisher Plugin: Can be used to show the generated screenshots right inside Jenkins.
- AnsiColor Plugin: Used to show the coloured output of the fastlane tools. Don’t forget to enable
Color ANSI Console Outputin theBuild Environmentor your project. - Rebuild Plugin: This plugin will save you a lot of time.
- Keychains and Provisioning Profiles Plugin: Manages keychains across Jenkins installations.
Build Step
Add an "Execute shell" build step using your appropriate fastlane command per the example below:
fastlane appstore
Replace appstore with the lane you want to use.
(note: if using a Gemfile, prefix that command with bundle exec)
setup_jenkins
You can use setup_jenkins action which integrates well with the Keychains and Provisioning Profiles Plugin. Selected keychain will be automatically unlocked and the selected code signing identity will be used. Also all build results, like IPA files, archives, dSYMs and result bundles will be stored in the ./output folder in the job workspace. In additions setup_jenkins will create separate derived data folder for each job (in the ./derivedData).
Under the hood setup_jenkins configures other actions like: gym, scan, xcodebuild, backup_xcarchive and clear_derived_data.
commit_version_bump || git_commit
You can use commit_version_bump or git_commit action to commit changes to your repository in your fastlane setup. When you are using webhooks to trigger your build on a push this will cause an infinite loop of triggering builds.
GitLab
When you are using GitLab you will need the GitLab Plugin. Inside the job you want to configure you go to Build Triggers > Build when a change is pushed to GitLab > Enable [ci-skip].
When you include [ci-skip] in your build this commit won't trigger the build in jenkins at all.
Example
build_number = increment_build_number
commit_version_bump(message:"[ci-skip] Version Bump to #{build_number}")
git_commit(path:"./CHANGELOG.md", message:"[ci-skip] Updated CHANGELOG for Build #{build_number}")
push_to_git_remote
Test Results and Screenshots
To show the deployment result right in Jenkins
- Add post-build action
- Publish JUnit test result report
- Test report XMLs:
fastlane/report.xml
To show the generated screenshots right in Jenkins
- Add post-build action
- Publish HTML reports
- HTML directory to archive:
fastlane/screenshots - Index page:
screenshots.html
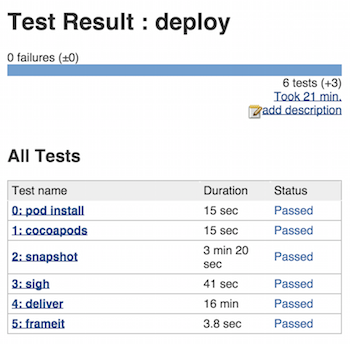
Save and run. The result should look like this: