New to fastlane? Click here to open the installation & setup instructions first
1) Install the latest Xcode command line tools
xcode-select --install
2) Install fastlane
# Using RubyGems
sudo gem install fastlane -NV

# Alternatively using Homebrew
brew install fastlane
3) Navigate to your project and run
fastlane init
fastlane screenshots for iOS and tvOS
Your App Store screenshots are probably the most important thing when it comes to convincing potential users to download or purchase your app. Unfortunately, many apps don't do screenshots well. This is often because taking screenshots of your app and then preparing them for display is time consuming, and it's hard to get everything right and consistent! For example:
- Are the screenshots in the App Store inconsistent with your latest app design?
- Is your app localized into many languages that require different screenshots for each?
- Have you made sure that no loading indicators are showing?
- Is the same content displayed for each of your size variations?
fastlane tools can automate this process making it fast, and consistent while giving you beautiful results!
Alternatives
For the full story about the many ways that developers can capture and beautify screenshots check out this article.
Manually Capturing Screenshots
Manually taking screenshots takes too much time, which also decreases the quality of the screenshots. Since it is not automated, the screenshots will show slightly different content on the various devices and languages. Many companies choose to create screenshots in one language and use them for all languages. While this might seem okay to us developers, there are many potential users out there that cannot read the text on your app screenshots if they are not localised. Have you ever looked at a screenshot with content in a language you don't know? It won't convince you to download the app.
However, the biggest disadvantage of this method is what happens when you need to repeat the process. If you notice a spelling mistake in the screenshots, if you release an update with a new design, or if you just want to show more up to date content, you'll have to create new screenshots for all languages and devices... manually.
The positive side of this approach is that your screenshots will all be crisp and correctly sized, with readable text.
Scaled Screenshots via App Store Connect
App Store Connect allows you to use one set of screenshots per device type, which will then be scaled to the appropriate size when viewed in the App Store on a user's device.
While this is convenient, this approach has the same problems as the device frame approach: The screenshots don't actually show how the app looks on the user's device. It's a valid way to start though, since you can gradually overwrite screenshots for specific languages and devices.
Capture Screenshots Automatically
snapshot works with fastlane to automate the process of capturing screenshots of your app. It allows you to:
- Capture hundreds of screenshots in multiple languages on all simulators
- Take screenshots in multiple device simulators concurrently to cut down execution time
- Do something else while the computer takes the screenshots for you
- Configure it once, and store the configuration so anyone on the team can run it
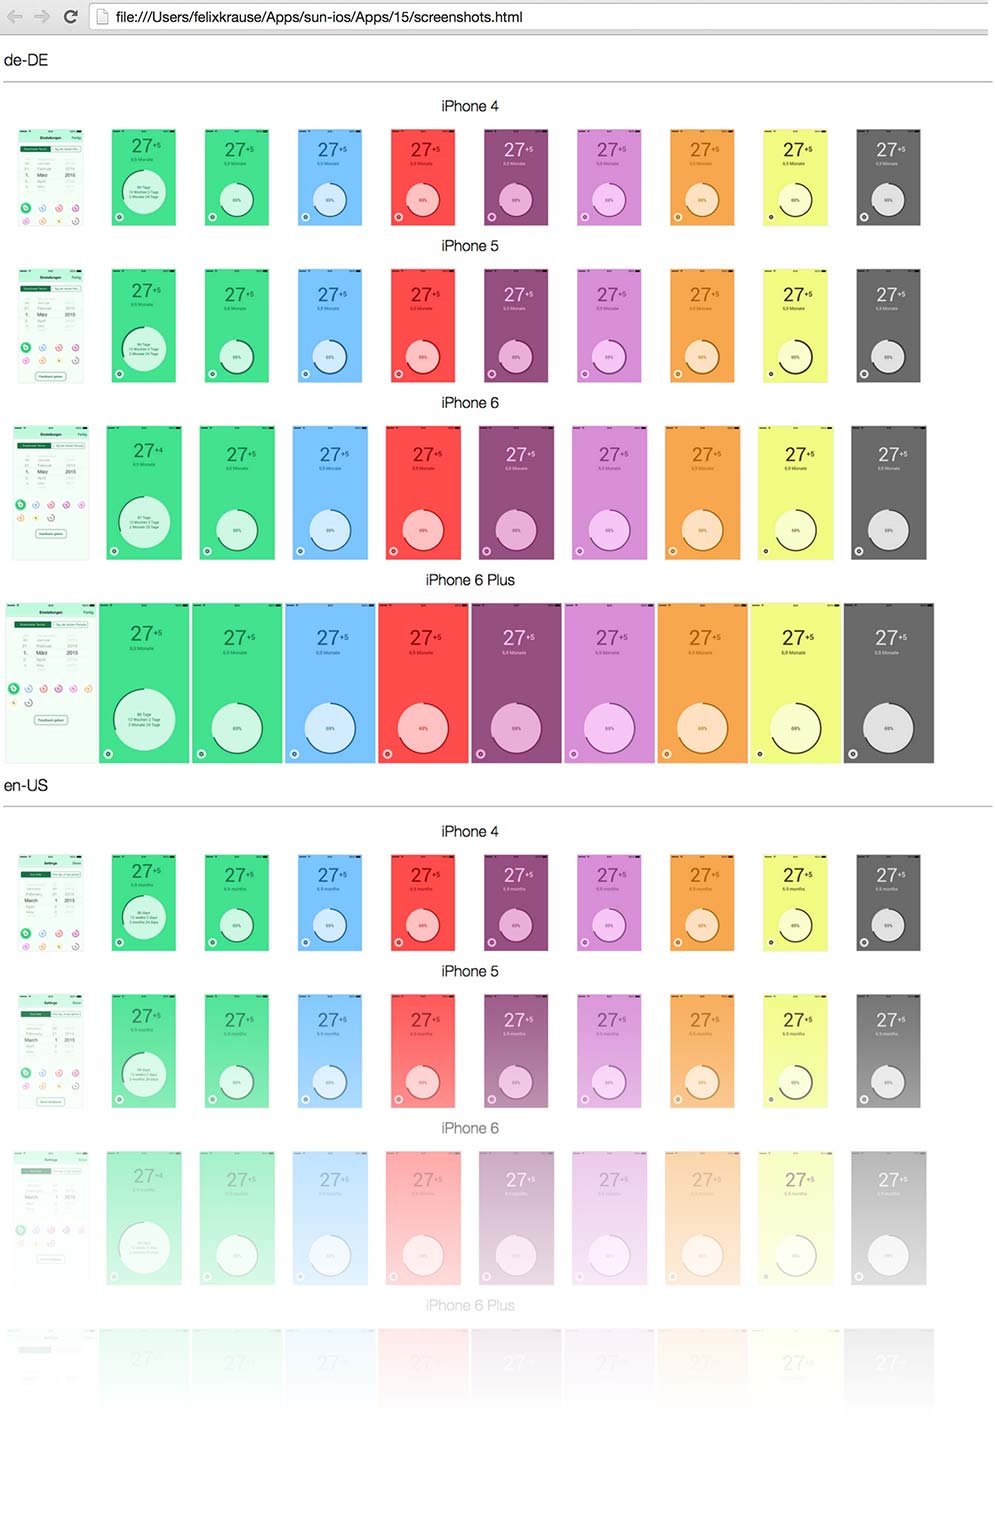
- Generate a beautiful web page showing all screenshots on all devices. This is perfect to send to Q&A, marketing, or translators for verification
- Avoid having loading indicators in your App Store screenshots by intelligently waiting for network requests to be finished
- Get a summary of how your app looks like across all supported devices and languages
After snapshot successfully captures all the screenshots, it will show you a beautiful HTML page to summarize all the screens that were captured:
Getting Started Using UI Tests
snapshot uses the capabilities of Apple's UI Tests to drive interactions with your app. To get familiar with writing UI Tests, check out the following introductions:
- WWDC 2015 Introduction to UI Tests
- A first look into UI Tests
- UI Testing in Xcode 7
- HSTestingBackchannel : ‘Cheat’ by communicating directly with your app
- Automating App Store screenshots using fastlane snapshot and frameit
To jump-start your UI tests, you can use the UI Test recorder, which you can start by clicking the red record button on the bottom of the window. By interacting with your app through the simulator while using it, Xcode will generate UI Test code for you. To learn more, check out this this blog post!
Setting Up snapshot
- Create a new UI Test target in your Xcode project (See the top part of this article)
- Run
fastlane snapshot initin your project folder - Add the
./SnapshotHelper.swiftfile to your UI Test target (You can move the file anywhere you want) - Add a new Xcode scheme for the newly created UI Test target
- Edit the scheme
- In the list on the left click "Build", and enable the checkbox under the "Run" column for your target.
- Enable the
Sharedbox of the newly created scheme - (Objective C only) Add the bridging header to your test class.
#import "MYUITests-Swift.h"- The bridging header is named after your test target with -Swift.h appended.
- In your UI Test class, click the
Recordbutton on the bottom left and record your interaction - To take a screenshot, call the following between interactions
- Swift:
snapshot("01LoginScreen") - Objective C:
[Snapshot snapshot:@"01LoginScreen" timeWaitingForIdle:10];
- Swift:
- Add the following code to your
setUp()method:
Swift:
let app = XCUIApplication()
setupSnapshot(app)
app.launch()
Objective C:
XCUIApplication *app = [[XCUIApplication alloc] init];
[Snapshot setupSnapshot:app waitForAnimations:NO];
[app launch];
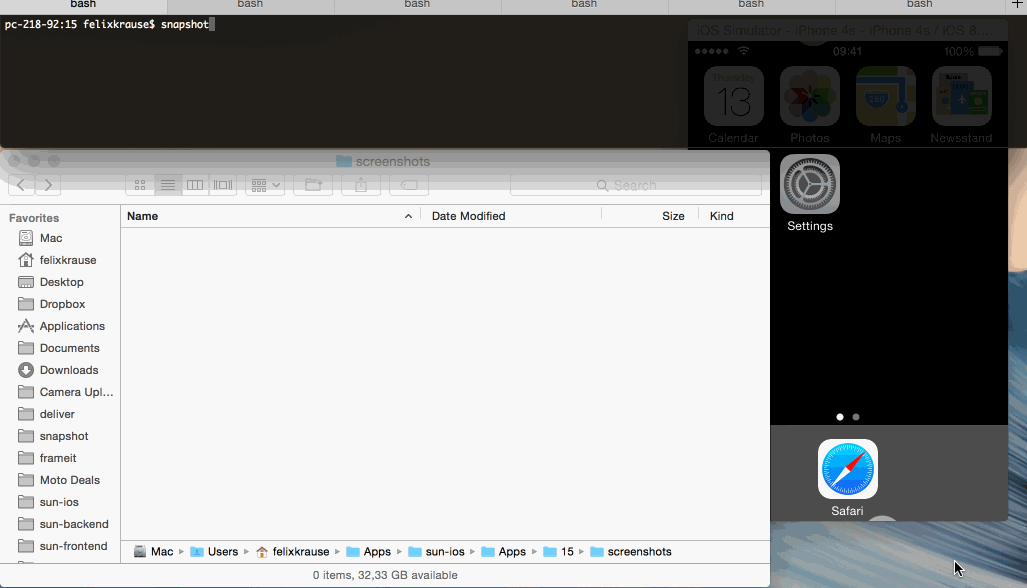
12. In the terminal run fastlane snapshot.
WARNING: Running the test in Xcode does not create the snapshots and will not generate the correct results - although no tests will fail. The command line program creates the necessary subdirectories, renames the files as appropriate, and generates the overview html page.
The setup process will also generate a Snapfile, looking similar to
# A list of devices you want to take the screenshots from
# devices([
#  "iPad (7th generation)",
#  "iPad Air (3rd generation)",
#  "iPad Pro (11-inch)",
#  "iPad Pro (12.9-inch) (3rd generation)",
#  "iPad Pro (9.7-inch)",
#  "iPhone 11",
#  "iPhone 11 Pro",
#  "iPhone 11 Pro Max",
#  "iPhone 8",
#  "iPhone 8 Plus"
# ])

languages([
  "en-US",
  "de-DE"
])

# The name of the scheme which contains the UI Tests
# scheme "SchemeName"

# Where should the resulting screenshots be stored?
# output_directory "./screenshots"

# clear_previous_screenshots true # remove the '#' to clear all previously generated screenshots before creating new ones

# Choose which project/workspace to use
# project "./Project.xcodeproj"
# workspace "./Project.xcworkspace"

# For more information about all available options run
# fastlane action snapshot
You can adapt this file to fit your project. Every time you run fastlane snapshot the file will be loaded automatically.
For a list of all available parameters that can be used in the Snapfile run fastlane action snapshot.
If you have fastlane installed, it's easy to give snapshot a try. First clone the fastlane repo, head over to the snapshot example project, and then run fastlane snapshot
git clone https://github.com/fastlane/fastlane  # Clone the fastlane repo
cd fastlane/snapshot/example                    # Navigate to the example project
fastlane snapshot                               # Generate screenshots for the sample app
Upload Screenshots to the App Store
After generating your screenshots using fastlane snapshot, you usually want to upload them to App Store Connect.
If you followed the setup guide, you already ran fastlane init before, so you should have your existing screenshots and metadata inside the fastlane/screenshots and fastlane/metadata directory. Running fastlane snapshot will store the screenshots in the fastlane/screenshots directory by default.
To upload the screenshots stored in fastlane/screenshots, just run
fastlane deliver
This will also show you a metadata summary, before actually uploading the screenshots, as this will overwrite the metadata and screenshots you already have on App Store Connect.
Use in Fastfile
To put all of this together so that anyone on your team could trigger generating and uploading new screenshots, you can define a fastlane lane called screenshots. It would be responsible for:
- Running your app through snapshot to automatically capture your screenshots
- Having deliver send your final screenshots to App Store Connect for use in the App Store
Add the following code to your fastlane/Fastfile:
lane :screenshots do
  capture_screenshots
  upload_to_app_store
end
To get a list of all available options for each of the steps, run
fastlane action capture_screenshots
fastlane action upload_to_app_store
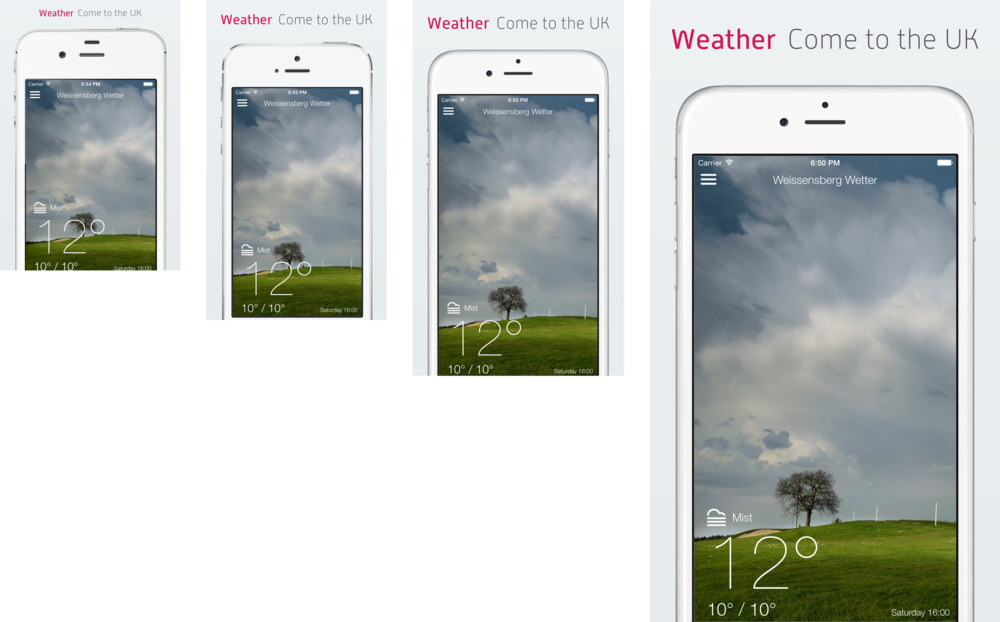
Put Your Screenshots Into Device Frames
frameit helps you beautify your screenshots with device frames and text by running one simple command. It provides support for:
- Multiple device types
- Portrait and landscape orientations
- Black and silver devices
- Setting a background color and decorating the image with text
Usage
To automatically add device frames around all screenshots in the current directory and its subdirectories, just run:
fastlane frameit
This will only add a device frame around the screenshots, not the background and title. Those images can be used for your website, email newsletter and similar.
If you want to implement the custom titles and background, you'll have to setup a Framefile.json, more information can be found here.
If you want to upload the screenshots to the App Store, you have to provide a Framefile.json, with titles and background, otherwise the resolution of the framed screenshots doesn't match the requirements of App Store Connect.
Dependencies
Installing ImageMagick
To perform image manipulation, frameit depends on a tool called imagemagick. The easiest way to install it is through homebrew:
brew install libpng jpeg imagemagick
Troubleshooting ImageMagick
If you have installed imagemagick but are seeing error messages like:
mogrify: no decode delegate for this image format `PNG'
You may need to reinstall and build from source. Run:
brew uninstall imagemagick; brew install libpng jpeg; brew install imagemagick --build-from-source
Setting Up Device Frames
To download the latest device frames, you can run
fastlane frameit setup
This usually happens automatically when you use frameit for the first time on a new machine
To add the framing to your deployment process, use the following code in your Fastfile:
lane :screenshots do
  capture_screenshots
  frame_screenshots(white: true)
  upload_to_app_store
end
To get a list of all available options for frame_screenshots (which calls into frameit)
fastlane action frame_screenshots
Advanced snapshot
Sample uses
lane :screenshots do
  capture_screenshots
end
Your screenshots will be stored in the ./screenshots/ folder by default (or ./fastlane/screenshots if you're using fastlane)
If any error occurs while running the snapshot script on a device, that device will not have any screenshots, and snapshot will continue with the next device or language. To stop the flow after the first error, run
capture_screenshots(stop_after_first_error: true)
Also by default, snapshot will open the HTML after all is done. This can be skipped with the following command
capture_screenshots(skip_open_summary: true)
There are a lot of options available that define how to build your app, for example
capture_screenshots(scheme: "UITests", configuration: "Release", sdk: "iphonesimulator")
Reinstall the app before running snapshot
capture_screenshots(reinstall_app: true, app_identifier: "tools.fastlane.app")
By default snapshot automatically retries running UI Tests if they fail. This is due to randomly failing UI Tests (e.g. #372). You can adapt this number using
capture_screenshots(number_of_retries: 3)
Add photos and/or videos to the simulator before running snapshot
capture_screenshots(add_photos: "MyTestApp/demo.jpg", add_videos: "MyTestApp/demo.mp4")
For a list for all available options run
fastlane action capture_screenshots
Reset Xcode simulators
You can run this command in the terminal to delete and re-create all iOS simulators. This is useful when Xcode duplicated your local simulators.
fastlane snapshot reset_simulators
Launch Arguments
You can provide additional arguments to your app on launch. These strings will be available in your app (eg. not in the testing target) through ProcessInfo.processInfo.arguments. Alternatively, use user-default syntax (-key value) and they will be available as key-value pairs in UserDefaults.standard.
launch_arguments([
  "-firstName Felix -lastName Krause"
])
name.text = UserDefaults.standard.string(forKey: "firstName")
// name.text = "Felix"
snapshot includes -FASTLANE_SNAPSHOT YES, which will set a temporary user default for the key FASTLANE_SNAPSHOT, you may use this to detect when the app is run by snapshot.
if UserDefaults.standard.bool(forKey: "FASTLANE_SNAPSHOT") {
    // runtime check that we are in snapshot mode
}
Specify multiple argument strings and snapshot will generate screenshots for each combination of arguments, devices, and languages. This is useful for comparing the same screenshots with different feature flags, dynamic text sizes, and different data sets.
# Snapfile for A/B Test Comparison
launch_arguments([
  "-secretFeatureEnabled YES",
  "-secretFeatureEnabled NO"
])
Update snapshot helpers
Some updates require the helper files to be updated. snapshot will automatically warn you and tell you how to update.
Basically you can run
fastlane snapshot update
to update your SnapshotHelper.swift files. In case you modified your SnapshotHelper.swift and want to manually update the file, check out SnapshotHelper.swift.
Clean status bar
To clean the status bar (9:41, full battery and full signal), use the override_status_bar parameter.
How does _snapshot_ work?
The easiest solution would be to just render the UIWindow into a file. That's not possible because UI Tests don't run on a main thread. So snapshot uses a different approach:
When you run unit tests in Xcode, the reporter generates a plist file, documenting all events that occurred during the tests (More Information). Additionally, Xcode generates screenshots before, during and after each of these events. There is no way to manually trigger a screenshot event. The screenshots and the plist files are stored in the DerivedData directory, which snapshot stores in a temporary folder.
When the user calls snapshot(...) in the UI Tests (Swift or Objective C) the script actually does a rotation to .Unknown which doesn't have any effect on the actual app, but is enough to trigger a screenshot. It has no effect to the application and is not something you would do in your tests. The goal was to find some event that a user would never trigger, so that we know it's from snapshot. On tvOS, there is no orientation so we ask for a count of app views with type "Browser" (which should never exist on tvOS).
snapshot then iterates through all test events and check where we either did this weird rotation (on iOS) or searched for browsers (on tvOS). Once snapshot has all events triggered by snapshot it collects a ordered list of all the file names of the actual screenshots of the application.
In the test output, the Swift snapshot function will print out something like this
snapshot: [some random text here]
snapshot finds all these entries using a regex. The number of snapshot outputs in the terminal and the number of snapshot events in the plist file should be the same. Knowing that, snapshot automatically matches these 2 lists to identify the name of each of these screenshots. They are then copied over to the output directory and separated by language and device.
Two things have to be passed on from snapshot to the xcodebuild command line tool:
- The device type is passed via the
destinationparameter of thexcodebuildparameter - The language is passed via a temporary file which is written by snapshot before running the tests and read by the UI Tests when launching the application
If you find a better way to do any of this, please submit an issue on GitHub or even a pull request :+1:
Also, feel free to duplicate radar 23062925.