frame_screenshots
Adds device frames around all screenshots (via frameit)

Easily put your screenshots into the right device frames
frameit allows you to put a gorgeous device frame around your iOS, macOS and Android screenshots just by running one simple command. Use frameit to prepare perfect screenshots for the App Store, your website, QA or emails.
frameit is part of fastlane: The easiest way to automate beta deployments and releases for your iOS and Android apps.
Features
Frame screenshot
Put a gorgeous device frame around your iOS, macOS and Android screenshots just by running one simple command. Support for:
- iPhone, iPad and Mac
- Set of Android devices
- Portrait and Landscape modes
- Several device frame colors
The complete and updated list of supported devices and colors can be found here
Here is a nice gif, that shows frameit in action:
Advanced Features
- Put framed screenshot on colored background, define padding
- add text above or under framed screenshot
- keyword + text
- choose text font and color
- multi line text
- "intelligent" positioning of text that always looks good(ish)
Results
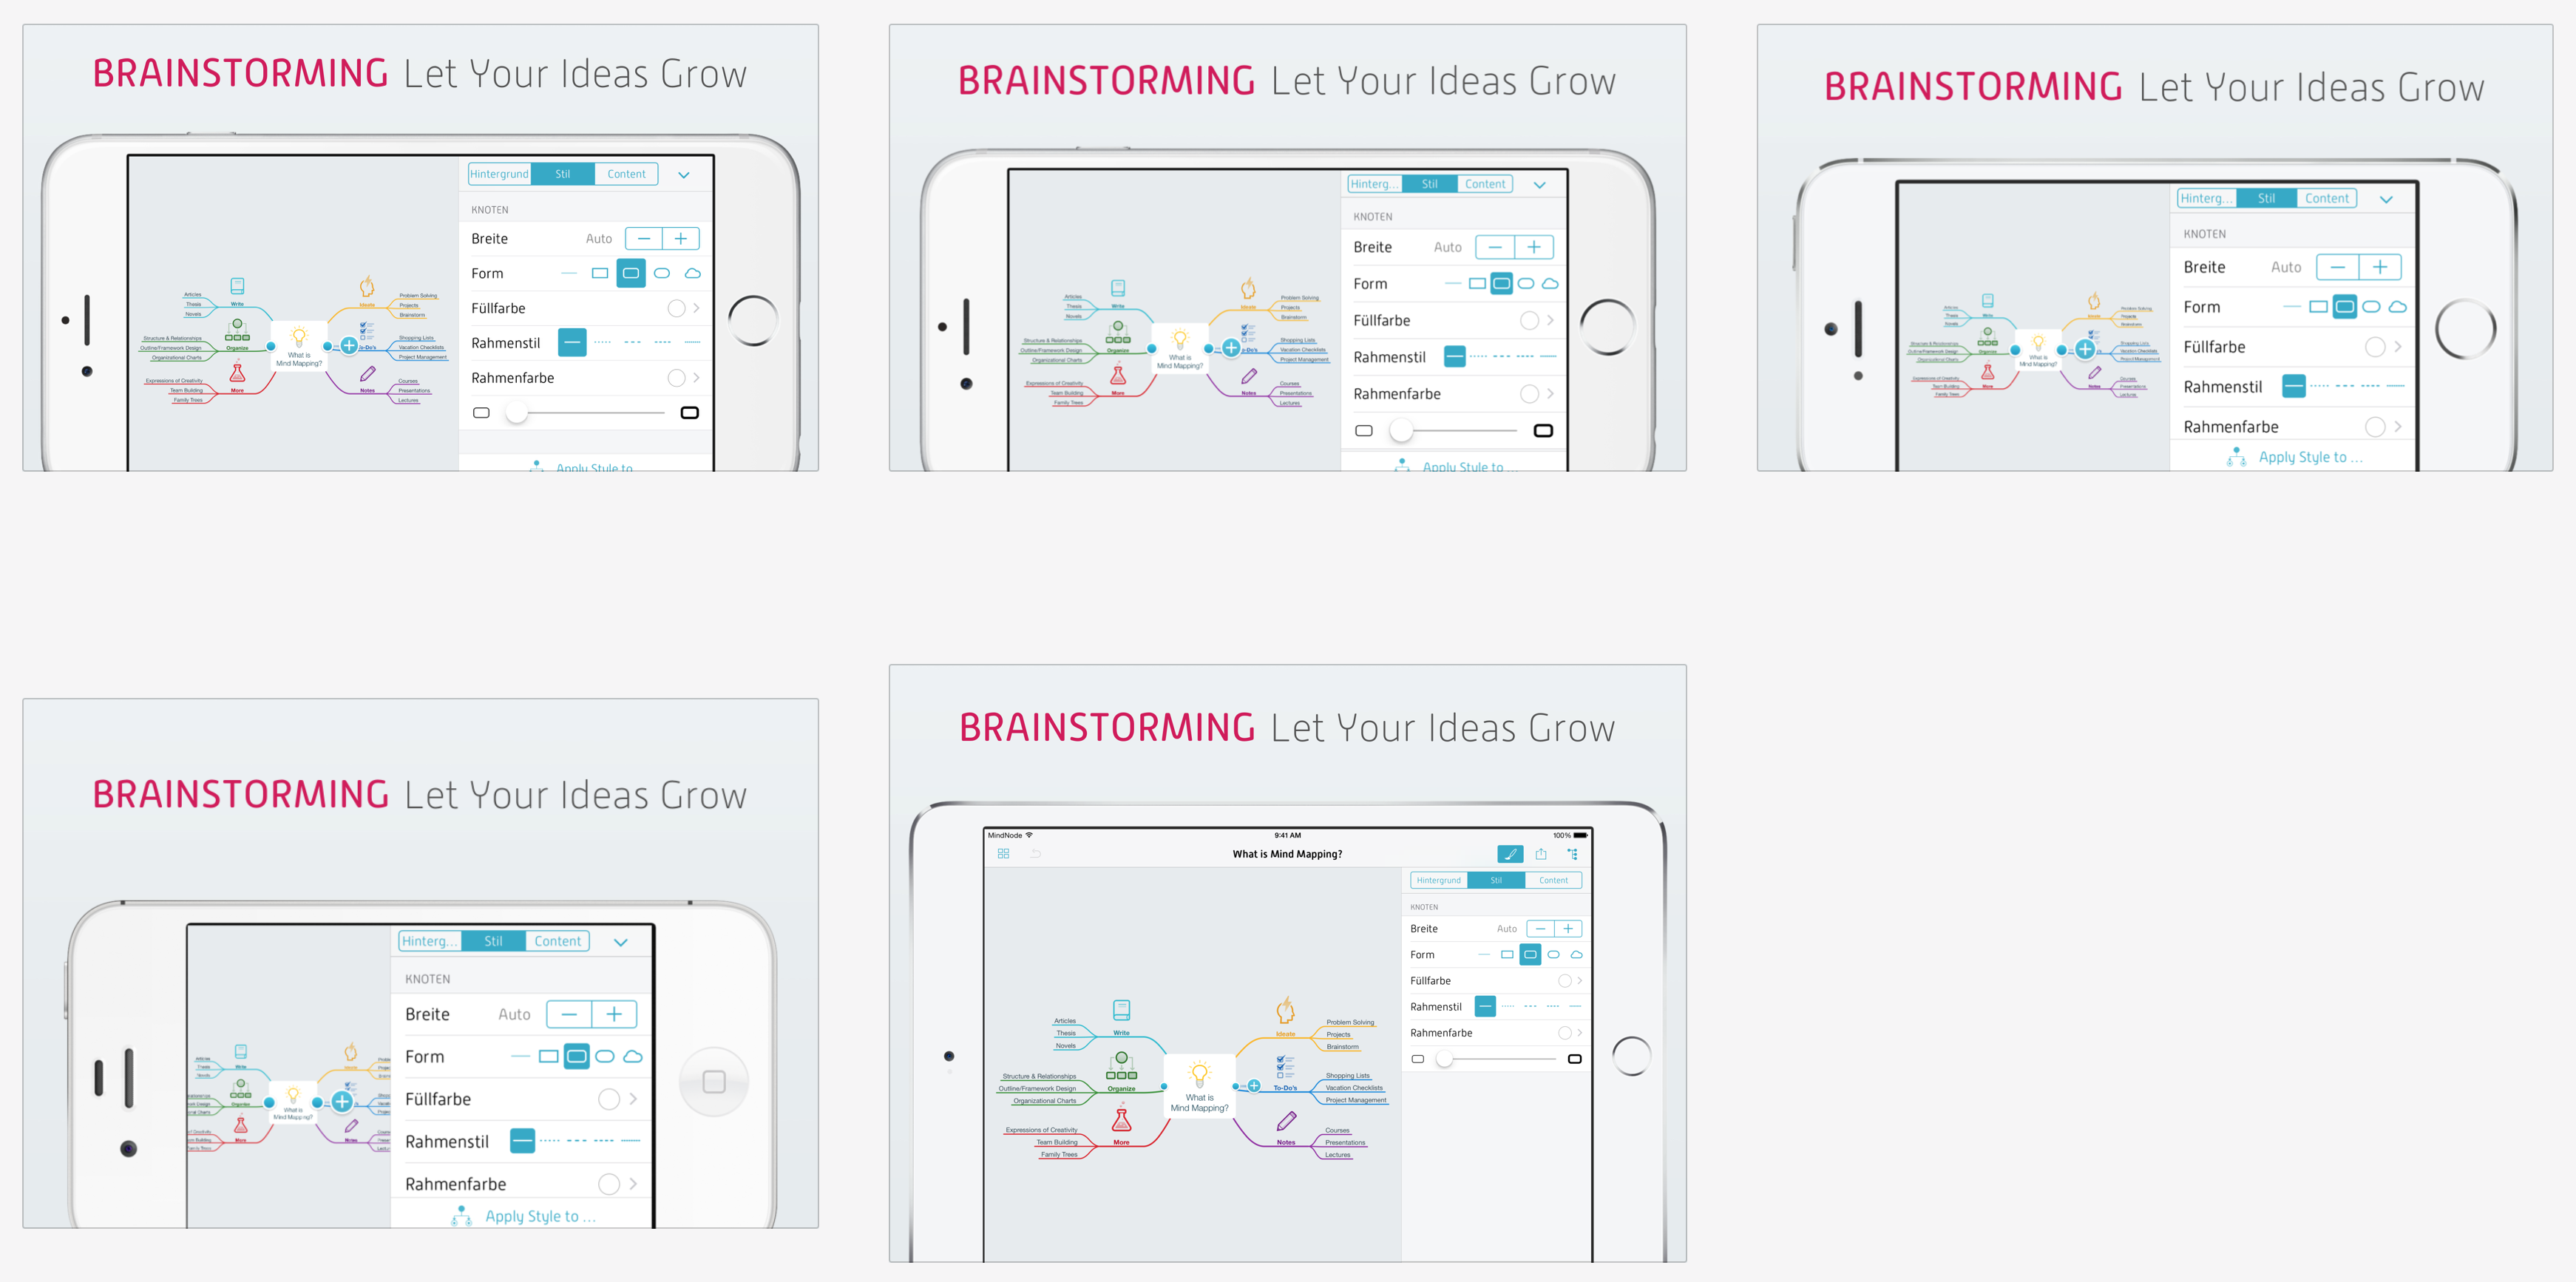
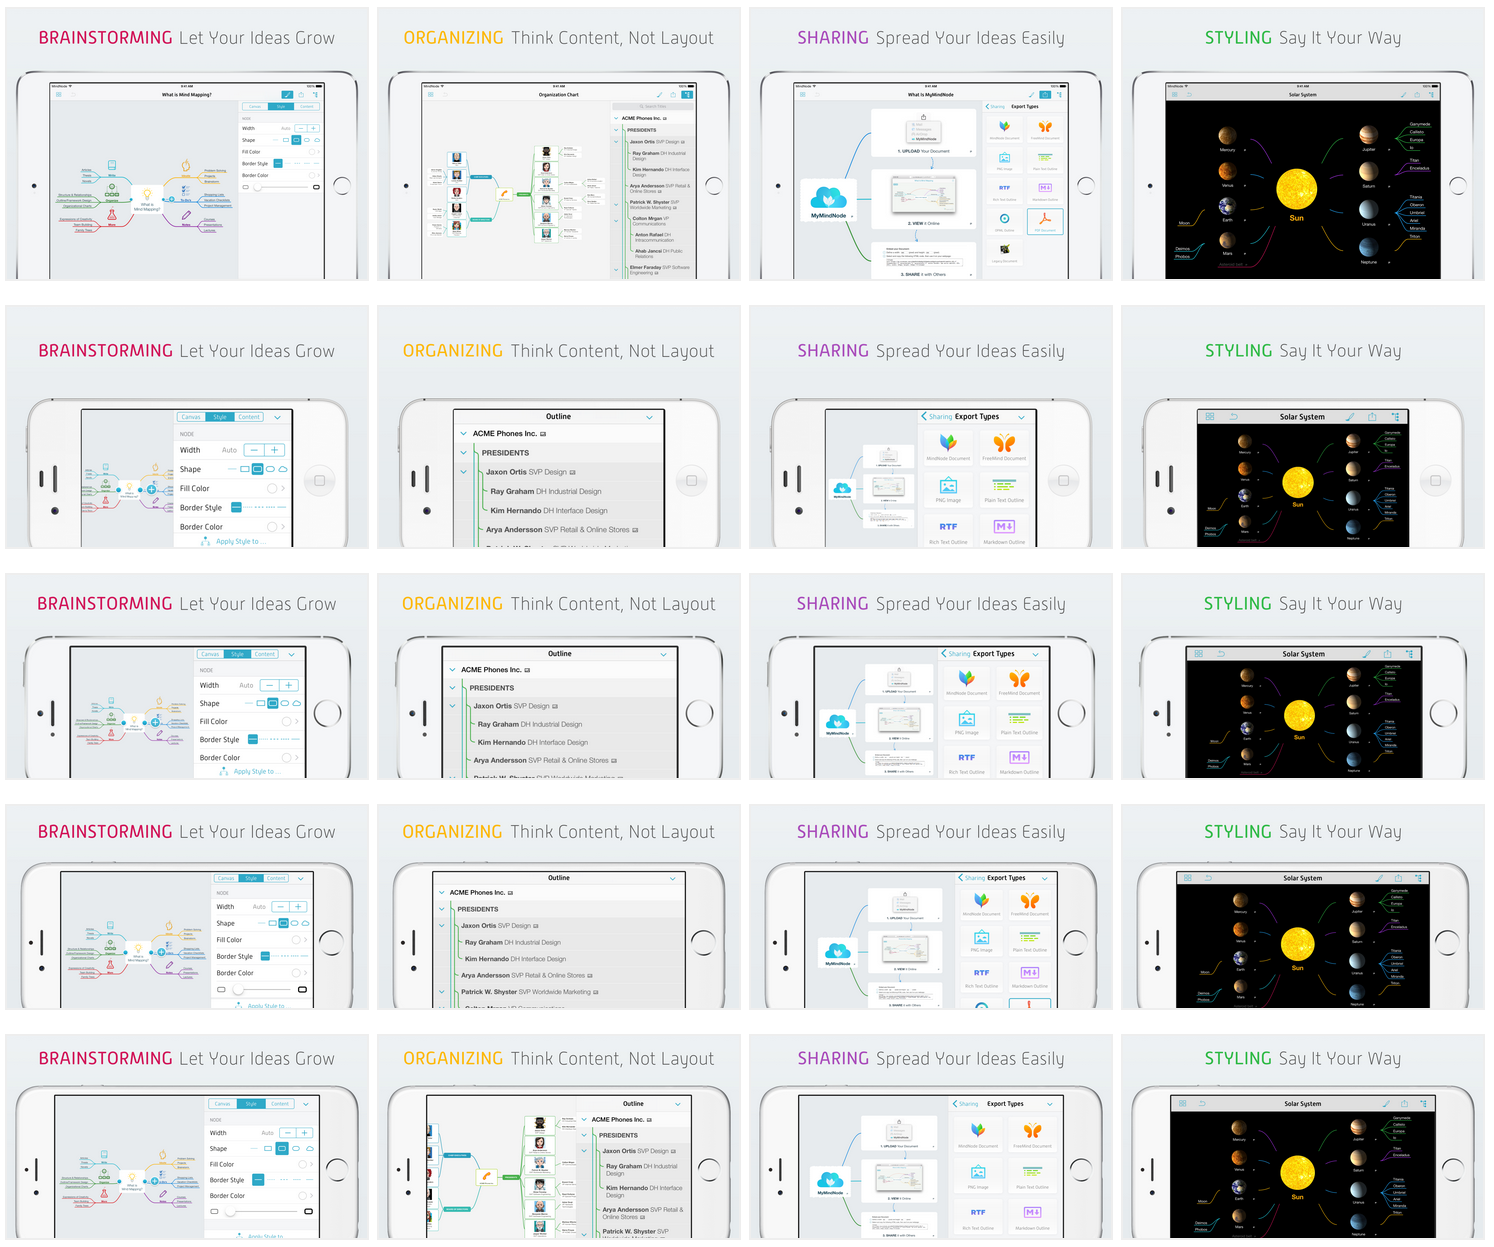
The frameit 2.0 update was kindly sponsored by MindNode, seen in the screenshots above.
The first time that frameit is executed the frames will be downloaded automatically. Originally the frames are coming from Facebook frameset and they are kept on this repo.
More information about this process and how to update the frames can be found here
Usage
Basic Usage
Why should you have to use Photoshop, just to add a frame around your screenshots?
Just navigate to your folder of screenshots and use the following command (iOS and Mac OS are default platforms for backward compatibility):
fastlane frameit
To frame Android screenshots:
fastlane frameit android
To use the silver version of the frames:
fastlane frameit silver
To download the latest frames
fastlane frameit download_frames
Note: When using frameit without titles on top, the screenshots will have the full resolution, which means they can't be uploaded to the App Store directly. They are supposed to be used for websites, print media and emails. Check out the section below to use the screenshots for the App Store.
Advanced Usage (optional)
Text and Background
With frameit it's possible to add a custom background and text below or above the framed screenshots in fonts and colors you define.
A working example can be found in the fastlane examples project.
Framefile.json
The Framefile allows to define general and screenshot specific information. It has the following general JSON structure:
{
  "device_frame_version": "latest",
  "default": {
    ...
  },
  "data": [
     ...
  ]
}
General parameters
The general parameters are defined in the default key and can be:
| Key | Description | Default value |
|---|---|---|
background |
The background that should be used for the framed screenshot. Specify the (relative) path to the image file (e.g. *.jpg). This parameter is mandatory. |
NA |
keyword |
An object that contains up to 3 keys to describe the optional keyword. See table below. | NA |
title |
An object that contains up to 3 keys to describe the mandatory title. See table below. | NA |
stack_title |
Specifies whether frameit should display the keyword above the title when both keyword and title are defined. If it is false, the title and keyword will be displayed side by side when both keyword and title are defined. | false |
title_below_image |
Specifies whether frameit should place the title and optional keyword below the device frame. If it is false, it will be placed above the device frame. | false |
show_complete_frame |
Specifies whether frameit should shrink the device frame so that it is completely shown in the framed screenshot. If it is false, clipping of the device frame might occur at the bottom (when title_below_image is false) or top (when title_below_image is true) of the framed screenshot. |
false |
padding |
The content of the framed screenshot will be resized to match the specified padding around all edges. The vertical padding is also applied between the text and the top or bottom (depending on title_below_image) of the device frame. There are 3 different options of specifying the padding: 1. Default: An integer value that defines both horizontal and vertical padding in pixels. A combination of option 2 and 3 is possible, e.g. |
50 |
interline_spacing |
Specifies whether frameit should add or subtract this many pixels between the individual lines of text. This only applies to a multi-line title and/or keyword to expand or squash together the individual lines of text. |
0 |
font_scale_factor |
Specifies whether frameit should increase or decrease the font size of the text. Is ignored for keyword or title, if font_size is specified. |
0.1 |
frame |
Overrides the color of the frame to be used. (Valid values are BLACK, WHITE, GOLD and ROSE_GOLD) |
NA |
title_min_height |
Specifies a height always reserved for the title. Value can be a percentage of the height or an absolute value. The device will be placed below (or above) this area. Convenient to ensure the device top (or bottom) will be consistently placed at the same height on the different screenshots. | NA |
use_platform |
Overrides the platform used for the screenshot. Valid values are IOS, ANDROID and ANY. |
IOS |
force_device_type |
Forces a specific device. Valid values are: Huawei P8, Motorola Moto E, Motorola Moto G, Nexus 4, Nexus 5X, Nexus 6P, Nexus 9, Samsung Galaxy Grand Prime, Samsung Galaxy Note 5, Samsung Galaxy S Duos, Samsung Galaxy S3, Samsung Galaxy S5, Samsung Galaxy S7, Samsung Galaxy S8, Samsung Galaxy S9, iPhone 5s, iPhone 5c, iPhone SE, iPhone 6s, iPhone 6s Plus, iPhone 7, iPhone 7 Plus, iPhone 8, iPhone 8 Plus, iPhone X, iPhone XS, iPhone XR, iPhone XS Max, iPad Air 2, iPad Mini 4, iPad Pro, MacBook, Google Pixel 3, Google Pixel 3 XL, HTC One A9, HTC One M8 | NA |
Specific parameters
The screenshot specific parameters are related to the keyword and title texts.
These are defined in the data key. This is an array with the following keys for each screenshot:
| Key | Description |
|---|---|
filter |
This is mandatory to link the individual configuration to the screenshot, based on part of the file name. Example: |
keyword |
Similar use as in default, except that parameter text can be used here because it is screenshot specific. |
title |
Similar use as in default, except that parameter text can be used here because it is screenshot specific. |
frame |
Overrides the color of the frame to be used. (Valid values are BLACK, WHITE, GOLD and ROSE_GOLD) |
use_platform |
Overrides the platform used for the screenshot. Valid values are IOS, ANDROID and ANY. |
force_device_type |
Forces a specific device. Valid values are the same as for the general parameter. |
Framefile keyword and title parameters
The keyword and title parameters are both used in default and data. They both consist of the following optional keys:
| Key | Description | Default value |
|---|---|---|
color |
The font color for the text. Specify a HEX/HTML color code. | #000000 (black) |
font |
The font family for the text. Specify the (relative) path to the font file (e.g. an OpenType Font). | The default imagemagick font, which is system dependent. |
font_size |
The font size for the text specified in points. If not specified or 0, font will be scaled automatically to fit the available space. frameit still shrinks the text, if it would not fit. |
NA |
font_weight |
The font weight for the text. Specify an integer value (e.g. 900). | NA |
text |
The text that should be used for the keyword or title. Note: If you want to use localised text, use |
NA |
Example
{
  "device_frame_version": "latest",
  "default": {
    "keyword": {
      "font": "./fonts/MyFont-Rg.otf"
    },
    "title": {
      "font": "./fonts/MyFont-Th.otf",
      "font_size": 128,
      "color": "#545454"
    },
    "background": "./background.jpg",
    "padding": 50,
    "show_complete_frame": false,
    "stack_title" : false,
    "title_below_image": true,
    "frame": "WHITE",
    "use_platform": "IOS"
  },

  "data": [
    {
      "filter": "Brainstorming",
      "keyword": {
        "color": "#d21559"
      }
    },
    {
      "filter": "Organizing",
      "keyword": {
        "color": "#feb909"
      },
      "frame": "ROSE_GOLD"
    },
    {
      "filter": "Sharing",
      "keyword": {
        "color": "#aa4dbc"
      }
    },
    {
      "filter": "Styling",
      "keyword": {
        "color": "#31bb48"
      }
    },
    {
      "filter": "Android",
      "use_platform": "ANDROID"
    }
  ]
}
You can find a more complex configuration to also support Chinese, Japanese and Korean languages.
The Framefile.json should be in the screenshots folder, as seen in the example.
.strings files
To define the title and optionally the keyword, put two .strings files into the language folder (e.g. en-US in the example project)
The keyword.strings and title.strings are standard .strings file you already use for your iOS apps, making it easy to use your existing translation service to get localized titles.
Notes
- These
.stringsfiles MUST be utf-8 (UTF-8) or utf-16 encoded (UTF-16 BE with BOM). They also must begin with an empty line. If you are having trouble see issue #1740 - You MUST provide a background if you want titles. frameit will not add the titles if a background is not specified.
Screenshot orientation
By default frameit adds a frame to your screenshot based on an orientation you took it. For a portrait (vertical orientation) it is going to add portrait frame and for a landscape (horizontal orientation) - landscape left (= Home button on the left side).
One way to override the default behavior is editing the file name by adding force_landscaperight to the end.
force_orientation_block
If the default behavior doesn't fit your needs and you don't want or can't rename your screenshots, you can customize frameit's orientation behavior by setting a force_orientation_block parameter. The valid values are: :landscape_left (home button on the left side), :landscape_right (home button on the right side), :portrait (home button on the bottom), nil (home button on the right side).
Examples
# It matches the filename to the framed device orientation
frameit(
  path: "./fastlane/screenshots",
  force_orientation_block: proc do |filename|
    case filename
      when "iPad Pro (12.9-inch)-01LoginScreen"
        :landscape_right
      when "iPhone 6 Plus-01LoginScreen"
        :portrait
      # and so on
    end
  end
)
# It frames the screenshots in landscape right whenever the filename contains `landscape` word
frameit(
  silver: true,
  path: "./fastlane/screenshots",
  force_orientation_block: proc do |filename|
    f = filename.downcase
    if f.include?("landscape")
      :landscape_right
    end
  end
)
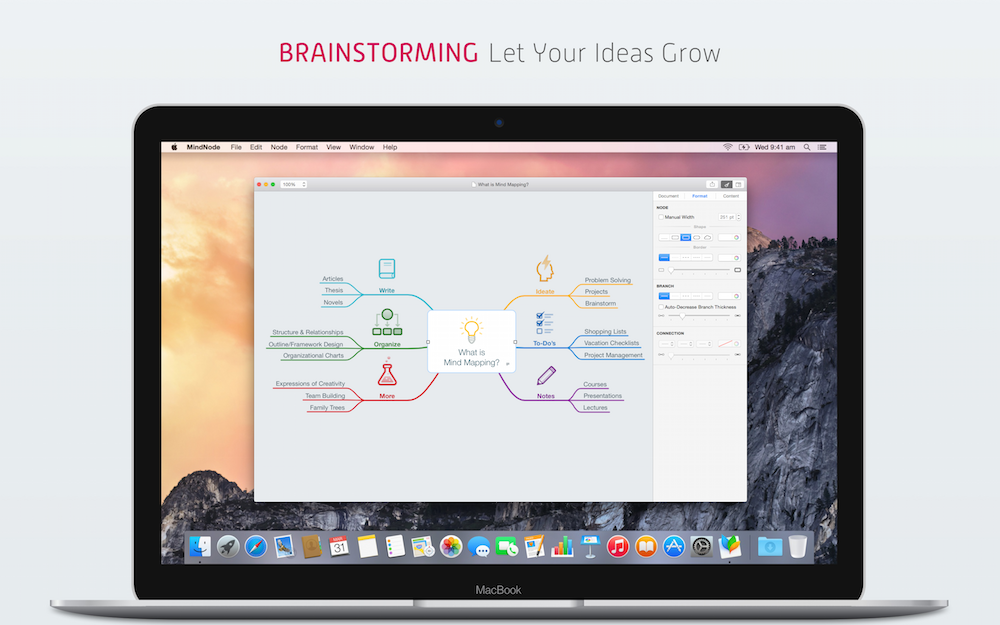
Mac
With frameit it's possible to also frame macOS Application screenshots. You have to provide the following:
- A (relative) path to a
backgroundimage file, which should contain both the background and the Mac. - The
offsetinformation so frameit knows where to position your screenshot on thebackground:offset: A string that specifies the horizontal and vertical offset in pixels, with respect to the top left corner of thebackgroundimage. The syntax is"+<horizontal>+<vertical>", e.g."+200+150".titleHeight: The height in pixels that should be used for the title.
Example
{
  "default": {
    "title": {
      "color": "#545454"
    },
    "background": "Mac.jpg",
    "offset": {
      "offset": "+676+479",
      "titleHeight": 320
    }
  },
  "data": [
    {
      "filter": "Brainstorming",
      "keyword": {
        "color": "#d21559"
      }
    }
  ]
}
Check out the MindNode example project.
Tips
Generate localized screenshots
Check out snapshot to automatically generate screenshots using UI Automation.
Resume framing
Framing screenshots is a slow operation. In case you need to resume framing, or just frame a couple updated screenshots again, you can rely on the --resume flag. Only screenshots which have not been framed yet – or for which there isn't an up-to-date framed image – will be framed. This feature uses the file modification dates and will reframe screenshots if the screenshot is newer than the framed file.
Upload screenshots
Use deliver to upload iOS screenshots to App Store Connect, or supply to upload Android screenshots to Play Store completely automatically 🚀
Use a clean status bar
You can set override_status_bar to true in snapshot to set the status bar to Tuesday January 9th at 9:41AM with full battery and reception. If you need more granular customization, to set a Carrier name for example, also set override_status_bar_arguments to the specific arguments to be passed to the xcrun simctl status_bar override command. Run xcrun simctl status_bar --help to see the options available.
Examples
# Sets the time to 9:41AM with full battery and reception, with the default carrier name: Carrier
capture_ios_screenshots(
    override_status_bar: true
)
# Set the time to 9:41AM, battery at 75% and charging, on the TELUS LTE network
capture_ios_screenshots(
    override_status_bar: true,
    override_status_bar_arguments: "--time 9:41 --dataNetwork lte --cellularMode active --cellularBars 4 --batteryState charging --batteryLevel 75 --operatorName TELUS"
)
Gray artifacts around text
If you run into any quality issues, like having a border around the font, it usually helps to just re-install imagemagick. You can do so by running
brew uninstall imagemagick
brew install imagemagick
Uninstall
gem uninstall fastlanerm -rf ~/.frameit
| frame_screenshots | |
|---|---|
| Supported platforms | ios, android, mac |
| Author | @KrauseFx |
6 Examples
frame_screenshots
frameit # alias for "frame_screenshots"
frame_screenshots(use_platform: "ANDROID")
frame_screenshots(silver: true)
frame_screenshots(path: "/screenshots")
frame_screenshots(rose_gold: true)
Parameters
| Key | Description | Default |
|---|---|---|
white |
Use white device frames | |
silver |
Use white device frames. Alias for :white | |
rose_gold |
Use rose gold device frames. Alias for :rose_gold | |
gold |
Use gold device frames. Alias for :gold | |
force_device_type |
Forces a given device type, useful for Mac screenshots, as their sizes vary | |
use_legacy_iphone5s |
Use iPhone 5s instead of iPhone SE frames | false |
use_legacy_iphone6s |
Use iPhone 6s frames instead of iPhone 7 frames | false |
use_legacy_iphone7 |
Use iPhone 7 frames instead of iPhone 8 frames | false |
use_legacy_iphonex |
Use iPhone X instead of iPhone XS frames | false |
use_legacy_iphonexr |
Use iPhone XR instead of iPhone 11 frames | false |
use_legacy_iphonexs |
Use iPhone XS instead of iPhone 11 Pro frames | false |
use_legacy_iphonexsmax |
Use iPhone XS Max instead of iPhone 11 Pro Max frames | false |
force_orientation_block |
[Advanced] A block to customize your screenshots' device orientation | * |
debug_mode |
Output debug information in framed screenshots | false |
resume |
Resume frameit instead of reprocessing all screenshots | false |
use_platform |
Choose a platform, the valid options are IOS, ANDROID and ANY (default is either general platform defined in the fastfile or IOS to ensure backward compatibility) | * |
path |
The path to the directory containing the screenshots | * |
* = default value is dependent on the user's system
Documentation
To show the documentation in your terminal, run
fastlane action frame_screenshots
CLI
It is recommended to add the above action into your Fastfile, however sometimes you might want to run one-offs. To do so, you can run the following command from your terminal
fastlane run frame_screenshots
To pass parameters, make use of the : symbol, for example
fastlane run frame_screenshots parameter1:"value1" parameter2:"value2"
It's important to note that the CLI supports primitive types like integers, floats, booleans, and strings. Arrays can be passed as a comma delimited string (e.g. param:"1,2,3"). Hashes are not currently supported.
It is recommended to add all fastlane actions you use to your Fastfile.
Source code
This action, just like the rest of fastlane, is fully open source, view the source code on GitHub